Stitch Cake: 5 Simple Steps For A Perfect Result
“Ohana means family, and family means nobody gets left behind or forgotten.” If there is one character that embodies the spirit of celebration and togetherness, it is Experiment 626. With the resurgence of Lilo & Stitch in pop culture, searches for Stitch Cake tutorials have spiked by 150% in the last year alone. Parents and party planners are ditching expensive bakery orders for the personal touch of a DIY creation.
But let’s be honest: sculpting a 3D alien can feel like a recipe for a Pinterest fail. That is why we have developed a fail-proof method that relies on texture rather than complex carving. By using a simple piping hack to mimic Stitch’s fluffy appearance, you can create a masterpiece that looks professional without the professional price tag. Get ready to bake a Stitch Cake that will be the absolute highlight of your “Ohana” celebration.
Ingredients List
To ensure your Stitch doesn’t just look good but tastes incredible, we are using a dense, flavorful base that holds up to decorating.
- The “Galaxy” Base:
- 3 Cups All-Purpose Flour: Provides the necessary structure for a tall cake.
- 2 Cups Granulated Sugar: For optimal sweetness and crust.
- 1 Cup Unsalted Butter (Room Temp): Critical for a tender crumb.
- 4 Large Eggs: The binding agent that prevents crumbling when cutting.
- 1 Cup Whole Milk: Adds moisture and richness.
- Electric Blue Gel Coloring: We recommend “Royal Blue” mixed with a touch of “Teal” for that authentic movie-accurate hue.
- The Decoration Toolkit:
- 3 Batches of Vanilla Buttercream: You need volume here. Running out of frosting mid-pipe is a nightmare.
- Midnight Black & Navy Blue Fondant: For the large pupils and nose.
- Pink/Mauve Fondant: For the inside of those iconic large ears.
- Edible Glue or Corn Syrup: To attach the fondant features securely.
Timing
This project is broken down into manageable chunks to keep it stress-free.
- Prep & Mix: 30 minutes
- Bake Time: 35-40 minutes
- Cooling: 90 minutes (Passive time)
- Decorating: 60 minutes
- Total Duration: Approx. 3 hours 45 minutes
Context: While this might seem long, it is 60% cheaper than ordering a custom 3D cake from a boutique bakery, and the active decorating time is surprisingly therapeutic!
Step-by-Step Instructions
Step 1: The Color infusion
Start by preheating your oven to 350°F (175°C). Cream your butter and sugar until it looks like light yellow clouds. Beat in the eggs one at a time.
- Stylist Tip: Add your gel coloring now, into the liquid batter. It is much harder to get a streak-free blue once the flour is added. Aim for a shade darker than you think you need; baking often fades the color slightly.
Step 2: The Bake & Level
Pour your batter into three 6-inch pans or two 8-inch pans. Bake until a skewer comes out clean.
- Crucial Action: Once cooled, you must level the tops of the cakes. Use a serrated knife to cut off the domes. A flat surface is non-negotiable for a character cake; otherwise, Stitch will look like he is leaning or falling over.
Step 3: The Crumb Coat Seal
Stack your layers with a generous filling of buttercream. Then, cover the entire cake in a very thin layer of blue frosting.
- The “Fridge” Trick: Place the cake in the freezer for 15 minutes after this step. This hardens the crumb coat, creating a solid “canvas” so your final piping sticks perfectly without sliding off.
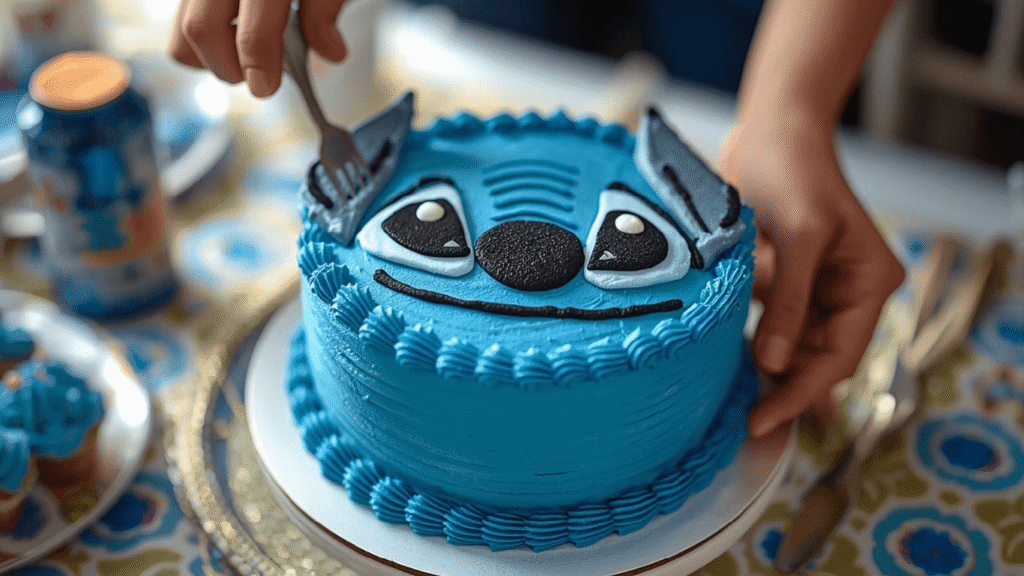
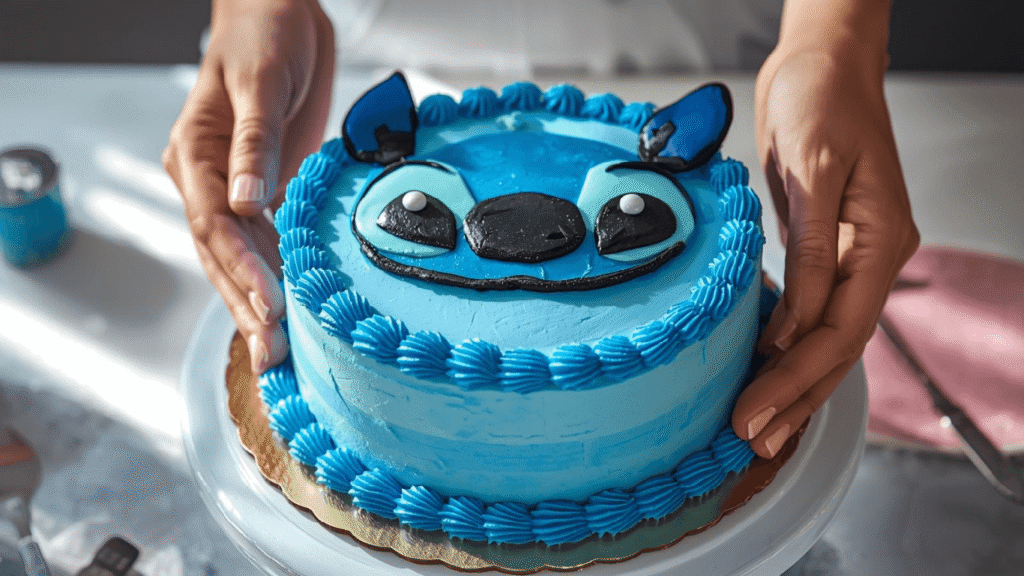
Step 4: The “Fur” Effect
This is where the magic happens. Fit your piping bag with a multi-opening tip (often called a grass tip) or a small star tip. Starting from the very bottom of the cake, pipe short, quick bursts, pulling the bag away to create wispy peaks.
- Technique: Work in horizontal rows, moving up the cake. The piping mimics the texture of fur, hiding any imperfections in the cake shape underneath. It is forgiving and incredibly effective visually.
Step 5: The Character Features
Roll out your fondant. Shape two large, tall triangles for ears (blue outside, pink inside). Cut two large ovals for eyes and a wide, rounded triangle for the nose.
- Structural Integrity: Stitch’s ears are huge. To keep them from drooping, knead a little Tylose powder into the fondant or let them dry on a baking sheet overnight so they harden. Insert skewers into the ears and push them deep into the cake.
Nutritional Information
This is a celebration cake, meant to be enjoyed! Here is the breakdown per slice (based on 14 servings).
| Nutrient | Amount per Serving | % Daily Value |
|---|---|---|
| Calories | 450 kcal | 22% |
| Total Fat | 24g | 31% |
| Saturated Fat | 15g | 75% |
| Cholesterol | 95mg | 32% |
| Sodium | 280mg | 12% |
| Carbohydrates | 58g | 21% |
| Sugars | 45g | – |
| Protein | 5g | 10% |
Healthier Alternatives for the Recipe
Parties include everyone, so here are ways to adapt the Stitch Cake for different needs.
- Lower Sugar Frosting: Try a Ermine Frosting (Flour Buttercream). It is much less sweet than American buttercream and has a whipped cream texture that is delicious, though you’ll need to work quickly as it is softer.
- Dye-Free Option: If you are allergic to blue dye, make a “Angel” Stitch (Experiment 624) instead! She is pink, and you can achieve a lovely pink hue using freeze-dried raspberry powder or beet juice concentrate naturally.
- Gluten-Free: Swap the flour for a high-quality Measure-for-Measure GF blend. Add an extra egg yolk to the batter to ensure the structure holds up against the weight of the fondant ears.
Serving Suggestions
Make the moment you bring the cake out unforgettable.
- The Tropical Setting: Place the cake on a bed of brown sugar (sand) and surround it with clean monstera leaves or hibiscus flowers.
- Flavor Boost: Serve with a side of coconut cream or a scoop of pineapple sorbet. The tropical flavors complement the vanilla cake and tie into the Hawaiian setting.
- The Reveal: If you have a Stitch plushie, have it “holding” the cake knife for a cute photo op before slicing.
Common Mistakes to Avoid
Don’t let these simple errors ruin your hard work.
- Soft Buttercream: If your kitchen is hot, the “fur” will melt into puddles. Fix: If the piping bag feels warm, put it in the fridge for 5 minutes. Keep your kitchen cool.
- Heavy Ears: Placing the ears too early can cause them to rip the cake. Fix: Add the fondant ears at the very last second before presenting the cake.
- Bleeding Colors: Placing black fondant eyes directly onto wet buttercream can cause black streaks. Fix: let the fondant pieces dry for an hour before placing them, or brush the backs with a tiny bit of white chocolate to seal them.
Storing Tips for the Recipe
Enjoy the leftovers (if there are any!) with these tips.
- Protective Dome: Because of the piping, plastic wrap will ruin the design. Use a large cake dome or an inverted large bowl to cover it on the counter for up to 3 days.
- Freezing Slices: Cut the remaining cake into slices. Flash freeze them on a baking sheet for an hour (so the frosting hardens), then wrap them individually. They make great lunchbox surprises!
- Fondant Care: If storing in the fridge, the fondant eyes might get sticky from condensation. This is normal; just don’t touch them until they dry out at room temperature.
Conclusion
Creating a Stitch Cake is about bringing a beloved character to life in the most delicious way possible. With our “fur” piping technique and sturdy base recipe, you bypass the stress of sculpting and go straight to the fun part. You are not just baking a cake; you are building a core memory for your family.
Ready to bring Experiment 626 into your kitchen? We can’t wait to see your version! Share your success stories in the comments below, or tag us in your party pics. Don’t forget to subscribe to our blog for more easy, impressive party themes and recipes!
FAQs
Q: Can I use a box mix for this? A: Yes! To make a box mix sturdy enough for this design, ignore the box instructions. Instead, use melted butter instead of oil, milk instead of water, and add one extra egg. This “doctoring” makes it taste homemade and hold its shape better.
Q: How far in advance can I make the fondant parts? A: You can (and should) make the ears, eyes, and nose up to a week in advance! Store them in a cardboard box (not an airtight container) at room temperature. This allows them to dry out and become stiff, which is perfect for standing up on the cake.
Q: What if I don’t have a grass tip for the fur? A: No problem! You can use a small round tip and pipe millions of little dots, or use a small star tip to pipe “rosettes” all over. It gives a different texture (more like “curly” fur) but looks just as cute and effectively covers the cake.
Q: Can I make this a chocolate Stitch cake? A: Absolutely. Use a chocolate base. For the frosting, you will need to start with a white vanilla buttercream to tint it blue. It is very difficult to tint chocolate frosting blue (it turns a muddy green-brown).
Your feedback helps other cooks succeed. Rate this recipe!
A Recipe for Joy, Not Just Cake
This article delivered exactly what the title promised: a perfect result. The steps were logical and the visuals in my mind (from the descriptions) were spot-on. What I loved most was that it focused on the method, which gave me the confidence to tackle the decorating. The cake was adorable and brought so much joy to my little cousin’s face. The only thing I’d love to see added is a quick troubleshooting section for frosting consistency. Fantastic guide overall