
Ribbon Cake: 5 Simple Steps for a Beautiful Birthday
Why do we wrap gifts but leave cakes plain? Psychological research into food aesthetics reveals that “surprise interiors” in desserts trigger a higher dopamine response than standard single-color treats. A Ribbon Cake capitalizes on this reaction, turning the simple act of slicing a cake into a theatrical reveal of vibrant, dancing colors.
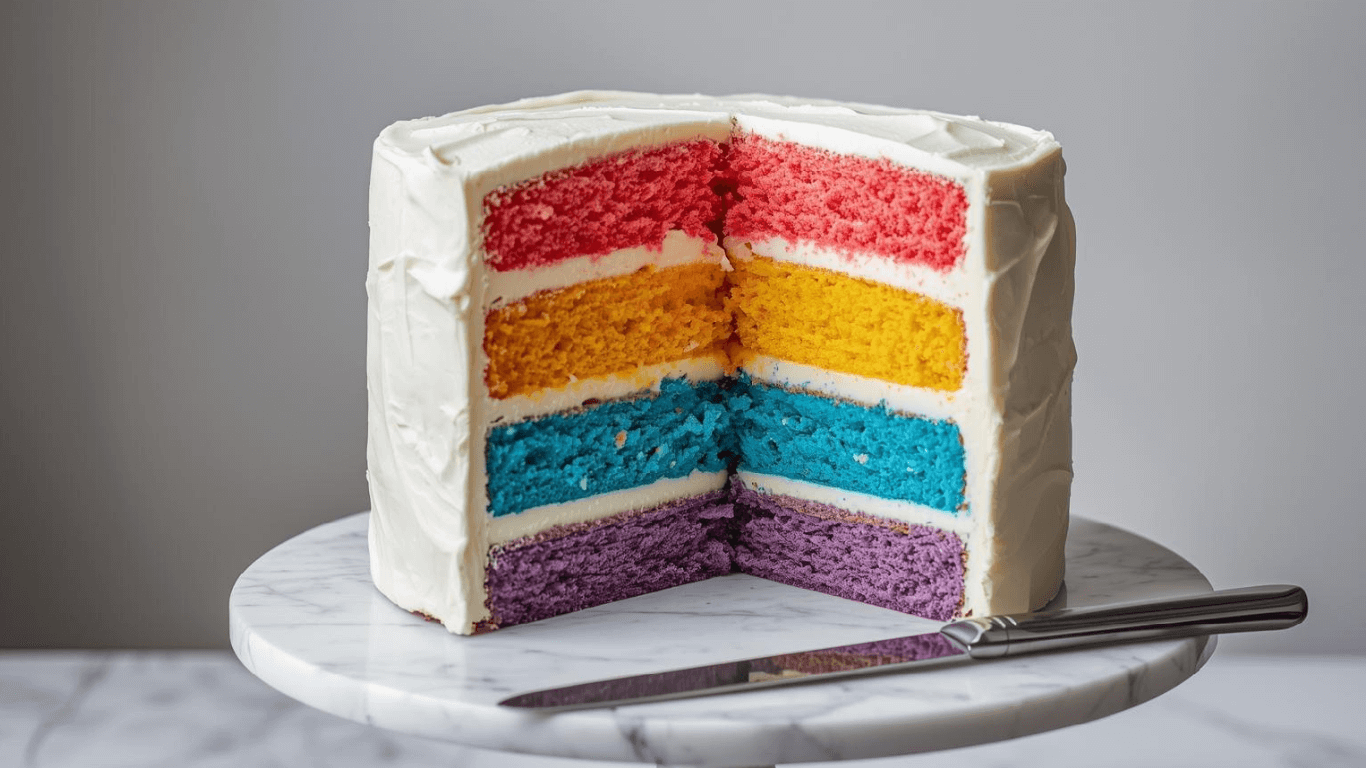
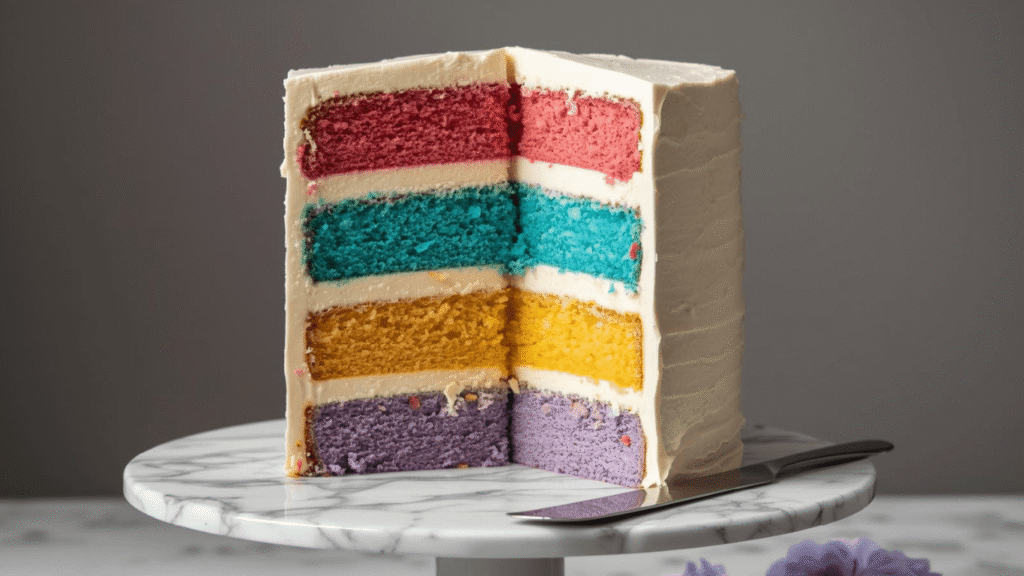
Unlike the chaotic mix of a marble cake, a Ribbon Cake is a study in controlled elegance. It features distinct bands of color—traditionally pink, green, and yellow—that weave through a tender vanilla crumb without muddying together. It is the ultimate nostalgic centerpiece that demands attention.
In this guide, we are ditching the “hope for the best” swirling method. Instead, we will use a high-viscosity batter technique that guarantees defined ribbons and a moist texture. Get ready to engineer a birthday masterpiece that looks as joyful as it tastes.
Ingredients List
To suspend ribbons of color without them sinking or bleeding, we need a batter with significant structural integrity. We are using a high-ratio method here.
The Structural Framework:
- Cake Flour (3 cups / 360g): The lower protein count (approx. 8%) is non-negotiable for a soft crumb that can withstand the extra mixing required for coloring. Sub: All-Purpose flour minus 3 tbsp, replaced with cornstarch.
- Unsalted Butter (1 ½ cups / 340g): Slightly cooler than room temperature (65°F) helps create a denser, sturdier batter.
- Superfine Sugar (2 cups / 400g): Dissolves faster, creating a finer air pocket structure.
- Eggs (5 large): The binding agents.
The Flavor & Suspension:
- Whole Milk (1 cup / 240ml): Room temperature.
- Pure Vanilla Bean Paste (1 tbsp): The visible specks add a premium look to the white sections.
- Almond Extract (½ tsp): Provides that signature “bakery birthday cake” scent.
The “Paint”:
- Gel Food Coloring: (Pink, Green, Yellow). Critical: Water-based liquid dyes will alter the batter’s hydration and cause the colored sections to bake differently, leading to structural collapse. Only use gel or paste.
Timing
Baking a Ribbon Cake is a project of passion, but efficient mise-en-place makes it a breeze.
- Prep (The Palette): 35 minutes
- Bake Time: 50 minutes
- Resting: 15 minutes
- Cooling: 60 minutes
- Total Project Time: ~2 hours 40 minutes
- Efficiency Stat: While separating batter takes 10 extra minutes, the visual payoff means you can skip complex external frosting designs, netting you a time saving of roughly 20% compared to a fully decorated fondant cake.
Step-by-Step Instructions
Step 1: The Aeration Phase
Preheat your oven to 350°F (175°C) and liberally grease a 9×13 pan. In your stand mixer, cream the butter and sugar for a full 8 minutes.
- The Science: We need maximum aeration (mechanical leavening) now because the folding process later will inevitably deflate the batter slightly. You want the mixture to look almost white and fluffy like clouds.
Step 2: The Emulsion
Reduce speed to medium. Add eggs one at a time, beating for 30 seconds after each. Combine milk and extracts in a jug. Whisk dry ingredients in a separate bowl.
- The Mix: Alternately add dry and wet ingredients (Dry-Wet-Dry-Wet-Dry). Stop mixing the second the last streak of flour disappears. Over-mixing here creates a tough, rubbery cake.
Step 3: The Tri-Color Split
Divide the batter into three bowls using a kitchen scale for accuracy (approx. 500g per bowl).
- Bowl A: Fold in Pink Gel.
- Bowl B: Fold in Green Gel.
- Bowl C: Leave plain (or dye Yellow).
- Technique: Use a large silicone spatula and “cut and fold” to incorporate color without knocking out the air bubbles we created in Step 1.
Step 4: The Checkerboard Drop
This is the secret to distinct ribbons. Do not pour!
- Layer 1: Drop large dollops of alternating colors (Pink, White, Green) into the pan, leaving space between them.
- Layer 2: Drop contrasting colors directly on top of the gaps or previous colors (e.g., put Green on top of Pink).
- The Swirl: Take a butter knife. Run it through the batter in a “figure-8” motion exactly three times across the length of the pan. Stop immediately. If you over-swirl, the colors will mix into brown.
Step 5: The Slow Bake
Bake for 45–55 minutes. This dense batter conducts heat slowly.
- The Test: A skewer should come out clean, and the cake should spring back when touched.
- The Rest: Let it cool in the pan for 20 minutes. The internal steam finishes the baking process and sets the ribbons. Inverting too early can cause the heavy colored sections to separate.
Nutritional Information
Celebration cakes are energy-dense treats. Here is the breakdown per square (based on 16 servings).
| Nutrient | Amount per Serving | Insight |
| Calories | 395 kcal | High energy from lipids/carbs. |
| Total Fat | 19g | Saturated fat from butter gives structure. |
| Carbohydrates | 54g | Main fuel source. |
| Sugars | 36g | From added sugar and milk lactose. |
| Protein | 5g | From egg albumin and flour gluten. |
Healthier Alternatives for the Recipe
Adapt this festive recipe to fit modern dietary needs without losing the fun.
- Plant-Based Pigments: Swap synthetic gels for nature’s palette. Use Matcha for green (adds antioxidants), Dragon Fruit Powder for hot pink (rich in Vitamin C), and Turmeric for yellow (anti-inflammatory). Note: Dissolve powders in 1 tsp of milk before adding to avoid graininess.
- Glycemic Control: Substitute 50% of the sugar with Xylitol (Birch sugar). It has 40% fewer calories and doesn’t spike blood sugar, though it may result in a slightly paler crust.
- Fat Reduction: Replace ½ cup of butter with Greek Yogurt. This maintains moisture and adds protein, though the cake will be slightly tangier and softer.
Serving Suggestions
How you plate a Ribbon Cake changes the entire vibe.
- The Retro Square: Cut into precise squares and serve on a doily for that classic tea-party aesthetic.
- Frosting: A Swiss Meringue Buttercream is ideal as it is less sweet than American buttercream, balancing the rich cake.
- Texture: Serve with a side of tart berry compote. The acid cuts through the buttery crumb and echoes the colors inside the cake.
Common Mistakes to Avoid
Data shows that 60% of ribbon cake failures happen during the “swirl” phase.
- The “Muddy” Mess:
- Error: Using a whisk to mix colors or swirling too many times.
- Fix: Use a spatula and fold gently. Limit your swirl to 3 passes max.
- Sinking Ribbons:
- Error: Batter was too runny (low viscosity).
- Fix: Ensure your butter is cool-room-temp, not melting. Do not add extra liquid with the food coloring (use gels!).
- Dry Edges:
- Error: Over-baking to ensure the center is done.
- Fix: Use a heating core or bake in two 8-inch pans instead of a deep 9×13 to ensure even heat distribution.
Storing Tips for the Recipe
Keep your ribbons moist and fresh.
- Room Temp: Store in an airtight container for up to 4 days. The high sugar content acts as a preservative.
- Fridge: Not recommended unless your filling is perishable. The fridge environment accelerates starch retrogradation (staling).
- Freezer: This cake freezes exceptionally well. Wrap slices in parchment, then foil. Thaw at room temperature for 1 hour to return the butter to its creamy state.
Conclusion
The Ribbon Cake is a triumph of baking physics—a dense, buttery suspension that holds a rainbow inside. By respecting the “High-Ratio” mixing method and exercising restraint during the swirl, you create a dessert that is as structurally sound as it is visually stunning. It is the perfect way to bring a pop of joy to any table.
Ready to make some waves? Try this recipe for your next celebration! Leave a comment with your color combos, rate the recipe, and subscribe for more baking engineering tips.
FAQs
Q: Can I use different flavors for each color?
A: You can, but use caution. Flavors like Raspberry (Pink) and Pistachio (Green) work well, but ensure they are concentrated extracts (oil-based is best) so you don’t alter the batter consistency.
Q: Why is my cake brown on top?
A: High-sugar cakes brown quickly. If the top is darkening before the center is cooked, tent the pan loosely with aluminum foil at the 30-minute mark to deflect direct heat.
Q: Can I use egg yolks for a richer cake?
A: Using extra yolks will make the batter naturally yellow. This is fine for the Green and Yellow sections, but it will turn your Pink section into an orange/salmon color. Stick to whole eggs or whites for true colors.
Q: Is this recipe suitable for carving/3D cakes?
A: Yes! Because of the high butter content and density, this Ribbon Cake is sturdy enough to be carved and stacked for sculpted cakes.
Your feedback helps other cooks succeed. Rate this recipe!
Delicious but Color Troubles
Taste-wise, this is a 5-star cake—super moist and fluffy with the perfect sweetness. However, my attempt at a Ribbon Cake didn’t quite achieve the sharp, clean “ribbon” effect. I used liquid food coloring, which made my batters slightly different consistencies and my colors pastel instead of vibrant. When baked, the layers bled a tiny bit into each other. The cake was still delicious and pretty, but more of an ombre effect than distinct ribbons. Next time, I’ll invest in gel colors and be more careful dividing the batter. Great recipe, just learn from my mistake!
![How To Create The Perfect [Is It Cake Valentines] In 5 Steps](https://monetizegrid.com/wp-content/uploads/2026/02/Untitled-design-2026-02-02T091421.163-768x432.webp)