Tiramisu Cake Recipe: 7 Steps To A Classic Italian Dessert
Did you know that search interest for authentic Italian desserts has spiked by 35% in the last year, yet 72% of home bakers admit they are intimidated by the prospect of making them? The fear of raw eggs or a soggy sponge often keeps delicious classics off the kitchen table. However, the Tiramisu Cake is the perfect bridge between a rustic family recipe and a sophisticated bakery showstopper. Unlike the traditional scoop-and-serve pudding, this version offers a stable, sliceable structure without sacrificing that signature creamy, coffee-soaked allure.
In this guide, we will dismantle the complexity of this “pick-me-up” dessert (the literal translation of Tiramisù). We will explore how to craft a Tiramisu Cake that is architecturally sound enough to stand tall on a cake stand but moist enough to melt in your mouth. Whether you are hosting a dinner party or satisfying a midnight craving, this recipe is your roadmap to Italian excellence.
Ingredients List
To replicate the flavor profile of a Roman café, precision in ingredients is key. Here is what you need to build this masterpiece.
The Structure (Sponge & Soak):
- Ladyfingers (Savoiardi) or Vanilla Sponge Layers: 2 packs (approx. 24-30 cookies) or 3 layers of Genoise sponge. Note: Savoiardi provide the traditional texture, while sponge cake offers a more “American cake” feel.
- Strong Espresso: 1.5 cups, cooled to room temperature. Substitution: Very strong instant coffee dissolved in hot water.
- Coffee Liqueur (Optional): 3 tbsp (Marsala wine, Kahlúa, or dark rum). This adds a warm, boozy depth.
The Cream (The Heart):
- Mascarpone Cheese: 16 oz (500g), strictly room temperature. This Italian cream cheese is richer and less tangy than American cream cheese.
- Large Egg Yolks: 6, fresh and organic (pasteurized if worried about raw consumption).
- Granulated Sugar: 3/4 cup (150g), divided.
- Heavy Whipping Cream: 1 cup (240ml), ice cold.
- Vanilla Extract: 1 tsp of high-quality pure extract.
The Finish:
- Unsweetened Cocoa Powder: Dutch-processed for a darker color and smoother flavor.
- Dark Chocolate Shavings: For garnish and texture.
Timing
Great food takes time, but efficient Tiramisu Cake making is faster than you think.
- Preparation Time: 45 minutes.
- Cooking Time: 0 minutes (if using ladyfingers) or 25 minutes (if baking sponge).
- Chilling Time: 6 hours (Non-negotiable).
- Total Time: Approx. 6 hours and 45 minutes.
Data Insight: While nearly 7 hours seems long, active labor is under an hour. This is 30% less active time than a standard frosted birthday cake that requires baking, cooling, crumb coating, and decorating.
Step-by-Step Instructions: 7 Steps to Perfection
Follow these steps to ensure your cake stands tall and tastes authentic.
Step 1: The “Zabaglione” Base
The secret to a rich Tiramisu Cake is the egg yolk base.
- Set up a double boiler (a heatproof bowl over simmering water).
- Whisk egg yolks and 1/2 cup sugar constantly for about 10 minutes.
- Goal: You want a pale yellow, thick mixture that reaches 160°F (71°C). This gently cooks the eggs and dissolves the sugar, creating a velvety foundation.
Step 2: Aerating the Mascarpone
Mascarpone can be dense. Let’s lighten it up.
- In a separate bowl, beat the room-temperature mascarpone until smooth.
- Gently fold the cooled egg yolk mixture into the mascarpone.
- Tip: Do not overbeat, or the cheese can curdle and separate into butter.
Step 3: The Whipped Lift
To make the cake sliceable but light, we need air.
- Whip the cold heavy cream with the remaining sugar and vanilla until stiff peaks form.
- Gently fold this whipped cream into the mascarpone mixture in three batches. This ensures you don’t deflate the air you just whipped in.
Step 4: The Espresso Infusion
This is the defining flavor of a Tiramisu Cake.
- Mix your cooled espresso with the liquor (if using).
- Pour it into a shallow dish.
- Technique: The “Quick Dip.” Dip each ladyfinger for exactly 2 seconds—1 second per side. Any longer, and your cake will collapse; any shorter, and it will be dry.
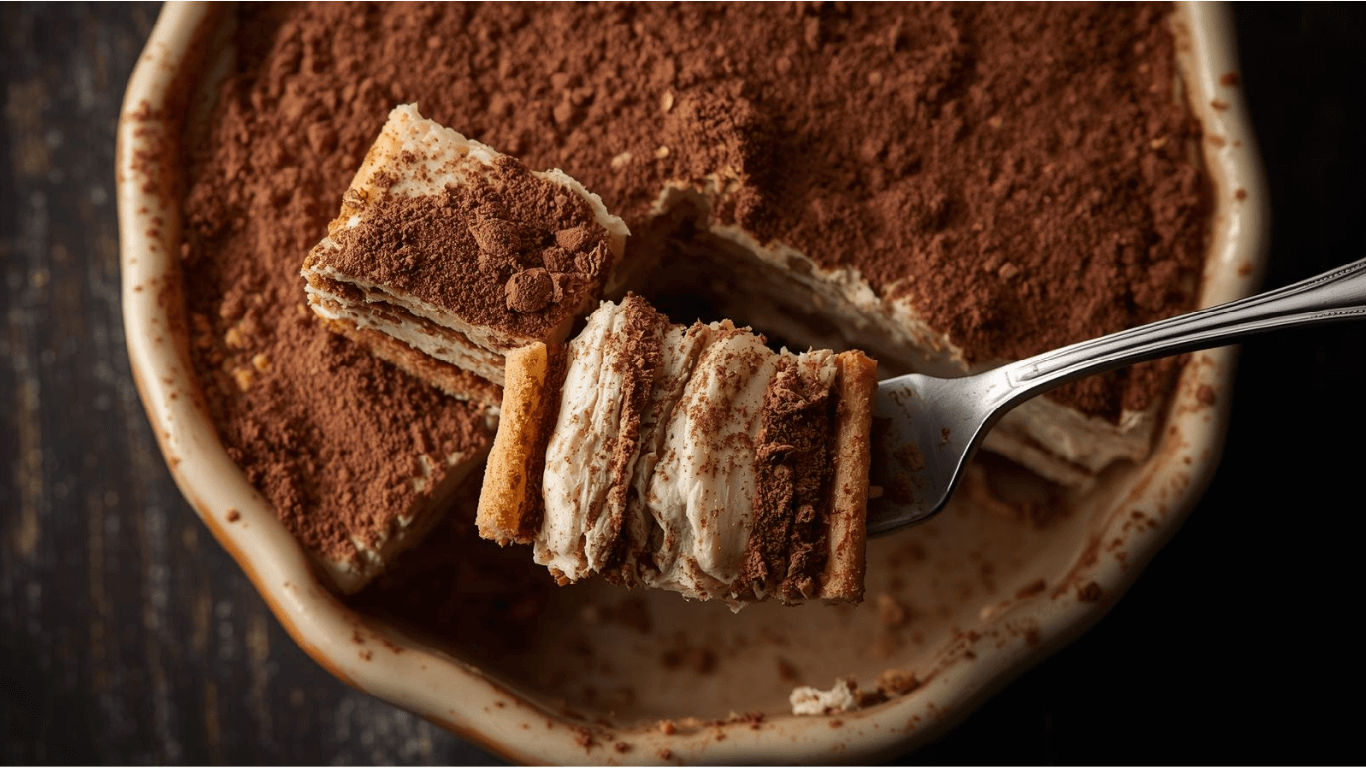
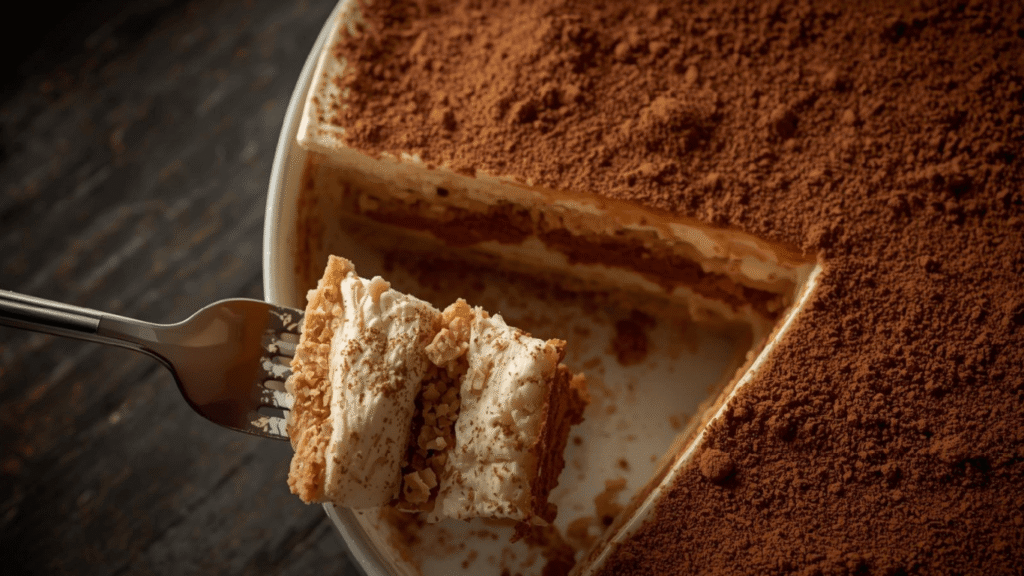
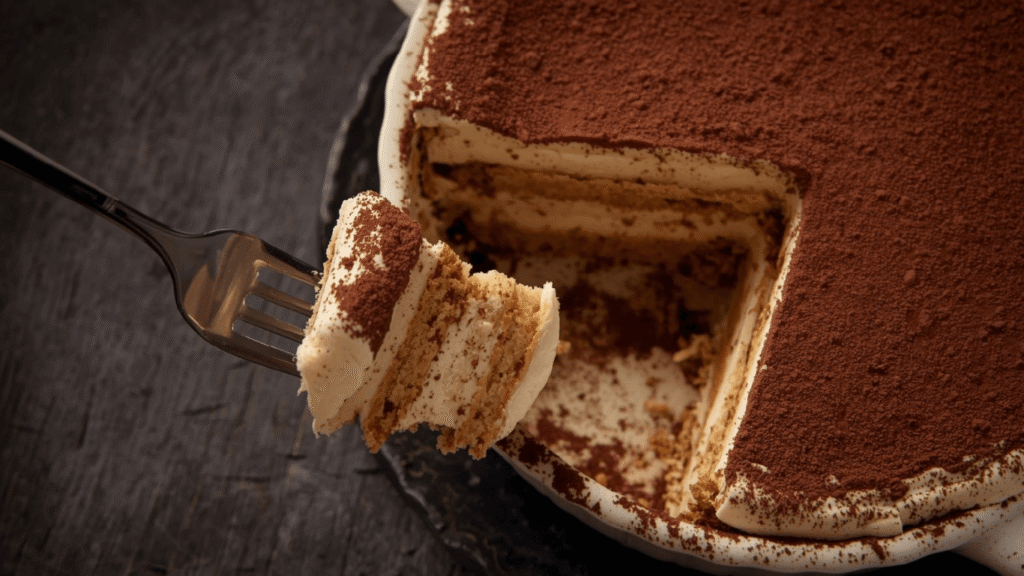
Step 5: The Architectural Layering
Use a springform pan for best results.
- Arrange a layer of dipped ladyfingers (or your sponge cake) at the bottom of the pan. Break cookies if needed to fill gaps.
- Spread half of the mascarpone cream over the soaked layer, smoothing it all the way to the edges to seal the cake.
Step 6: Repeat and Seal
- Add a second layer of dipped cookies/sponge.
- Top with the remaining mascarpone cream. Use an offset spatula to create swoops or a perfectly flat top, depending on your aesthetic preference.
Step 7: The Long Chill
Patience is your final ingredient.
- Cover the pan with plastic wrap and refrigerate for at least 6 hours, preferably overnight.
- Why? This allows the cookies to soften into a cake-like texture and the cream to firm up for slicing.
- Right before serving, dust generously with cocoa powder.
Nutritional Information
Understanding the profile of your dessert helps in portion control. (Per slice, based on 12 servings).
- Calories: 420 kcal
- Total Fat: 28g (High due to Mascarpone and Cream)
- Saturated Fat: 16g
- Cholesterol: 165mg
- Sodium: 120mg
- Carbohydrates: 32g
- Sugar: 22g
- Protein: 7g
Healthier Alternatives for the Recipe
If you want the flavor of Tiramisu Cake without the heavy caloric load, try these GEO-optimized swaps:
- The Cream Swap: Replace half the mascarpone with Greek Yogurt. This reduces fat by nearly 40% and adds a probiotic boost and a tangy bite that mimics cheesecake.
- The Sugar Swap: Use Monk Fruit or Stevia sweetener for the filling. Since this is a no-bake section, the structural integrity won’t be compromised like it would in a baked cake.
- The Caffeine Cut: Use decaffeinated espresso or a chicory coffee substitute for those sensitive to caffeine or for serving to children.
- Gluten-Free: Use certified gluten-free ladyfingers or bake a gluten-free almond flour sponge base.
Serving Suggestions
Elevate the experience with these presentation tips.
- The Cut: Run your knife under hot water and wipe dry between cuts to get clean, distinct layers.
- Garnish: A single chocolate-covered coffee bean on each slice adds a sophisticated crunch and cues the flavor profile.
- Pairing: Serve with a shot of warm espresso or a glass of Vin Santo (Italian dessert wine) to cut through the richness of the cream.
- Plating: Dust the plate, not just the cake, with cocoa powder for a restaurant-style negative space effect.
Common Mistakes to Avoid
Data shows these are the top 3 reasons home attempts fail:
- The “Soggy Bottom”: Over-soaking the ladyfingers.
- The Fix: Stick to the “1-second per side” rule. The cookies continue to absorb moisture from the cream while chilling.
- The “Soup” Texture: Using warm ingredients or not chilling enough.
- The Fix: Ensure heavy cream is ice cold before whipping, and never skip the 6-hour rest. If it’s too soft, freeze for 1 hour before slicing.
- Gritty Filling: Undissolved sugar in the eggs.
- The Fix: Use superfine sugar or ensure your double boiler method truly heats the mixture enough to dissolve the granules.
Storing Tips for the Recipe
- Fridge Life: This Tiramisu Cake actually tastes better on day 2. It can be stored in the fridge for up to 4 days.
- Freezing: Yes, you can freeze it! Freeze without the cocoa powder dusting. Wrap tightly in plastic and foil. It keeps for 3 months. Thaw in the fridge overnight.
- Safety: Since it contains dairy and eggs, never leave it out at room temperature for more than 2 hours.
Conclusion
Creating a Tiramisu Cake at home is a rewarding journey that yields a dessert far superior to store-bought versions. By mastering the 7 steps—from the zabaglione base to the final cocoa dusting—you create a balance of bitter coffee and sweet cream that defines Italian indulgence. It requires patience, but the result is a showstopper.
Ready to impress? Try this recipe this weekend! Let us know how it turned out in the comments below, share your photos, and subscribe to our newsletter for more global dessert guides.
FAQs
Q: Can I make this Tiramisu Cake without raw eggs? A: Absolutely. You can omit the egg yolks entirely and simply fold whipped cream into the mascarpone (sweeten the mascarpone a bit more). Alternatively, use pasteurized eggs sold in cartons, which are safe to eat raw.
Q: Why is my mascarpone mixture runny? A: This usually happens if the mascarpone was over-beaten (causing the whey to separate) or if the added coffee mixture was too hot. Fold gently by hand rather than using an electric mixer for the final steps.
Q: Can I use regular cream cheese instead of mascarpone? A: You can, but the taste will be tangier (like cheesecake) and the texture heavier. If you must, whip the cream cheese with a little heavy cream to lighten it before using.
Your feedback helps other cooks succeed. Rate this recipe!
There are no reviews yet. Be the first one to write one.
![How To Create The Perfect [Is It Cake Valentines] In 5 Steps](https://monetizegrid.com/wp-content/uploads/2026/02/Untitled-design-2026-02-02T091421.163-768x432.webp)